Recipe: Introducing the Cap of the Ribeye – Meat Lover’s Nirvana
If you’re a vegetarian, you might want to look away. We’re about to talk meat.
Many of you may have on an occasion had a nice juicy ribeye steak, or maybe a prime rib, roasted to a beautiful pink throughout.
I’m not sure about the rest of you, but I’ve harbored a secret love for the cap of the ribeye. I didn’t really know what it was called, but it was the juiciest and most tender section on the outside of the prime rib or the rib eye. Even though that section was cooked through and oftentimes held a bit of external caramelization, it was usually the best couple bits of the steak. That juicy beef flavor somehow seemed more intense, and even though it was brown-throughout, it was still juicy and tender. In effect, everything anyone could ever want in a beefy mouthful.
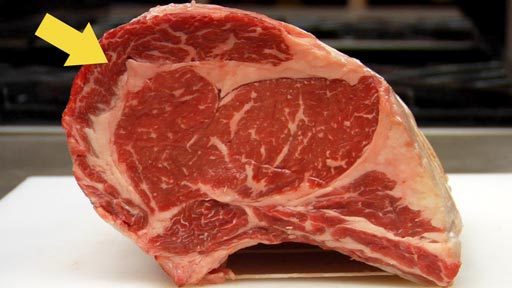
Now let’s imagine you had an entire rib primal, and shaved the entire cap (where that yellow arrow above is pointing) off the entire prime rib.
This is what you get.
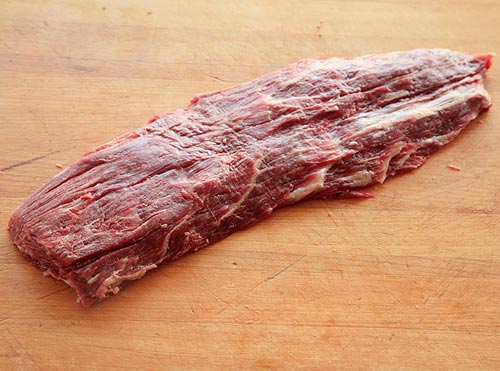
It forms a roughly 18″ long and 6″ wide steak that’s roughly one-inch thick and varies between 2-4 lbs depending on the butcher’s skill and the size of the primal.
Let me tell you folks, as you might imagine, this isn’t a cheap cut. However on rare occasions, you might find it being offered for reasonable prices at your butcher. Heck, I had to school my butcher on exactly what I wanted and have him shave it off an entire 20lb rib roast.
You’ll forever thank me if you get an opportunity to have this.
How to cook, you ask?
Oh, it can’t be simpler.
I’ll assume folks don’t have a grill, but you can certainly use one. I’ll stick to an oven preparation with a broiling pan for this recipe. Also, this recipe could be used for any steak as well, you mileage and times will vary based on thickness of the steak. The times I speak of in this recipe are geared toward the cap of ribeye which is an uneven cut but at its thickest is about 1.5 inches.
Ingredients:
- One succulent cap of ribeye.
- Salt & Pepper
Yes, that’s it. No special sauces, no fancy preparations. This is how steaks are done in the finest restaurants. Trust me, I’ve been behind the grill in a three-star restaurant before in my misbegotten youth. Sometimes the best is very simple.
Directions:
Preheat your oven to roast at 450 degrees. Let me note that many folks don’t really know how to use their ovens, and if you do, skip the next paragraph.
Most ovens have three settings: bake, roast, broil. The difference between each is rather significant and I’m explaining it only because it matter for this recipe. For bake, that usually means that the heating elements on the bottom of your oven are employed, with the assumption that heat will rise. For convection ovens, you have built-in fans that circulate the heat, helping normalize the temperatures, but the key point is that the heat is coming from below. For roast, the heating elements on the top of the oven are used to raise the temperature of the oven to a particular setting. This is especially relevant for the steak, because I’ll be telling you that we want the steak near the top of the oven so that it gets the benefit of the direct application of heat (which yields caramelization) versus indirect heat which raises the temperature of the steak without caramelization. Broil is similar to roast inasmuch as it allows the upper elements to activate, giving you direct heat from above, but it doesn’t turn on and off to maintain a certain temperature. Think of it as, turning the heat to full blast. You could certainly cook this steak with broil, but given that broiling elements can vary in ovens, I wanted to give you a fair estimate of times, thus my direction to use the roast feature of your oven.
Set the rack to the second from the top so that the steak isn’t just an inch or two from the heating elements (that would cause splatter and smoke and burn – not Good Eats [sorry, Alton]). Basically make sure your steak is at least two closed fists away from the heating element. At that distance you’ll get good caramelization without scorching things. Obviously you need to watch things, because ovens vary, thicknesses vary – so don’t take these instructions as gospel. They are hopefully a good guideline.
Sprinkle both sides of your steak generously with salt and pepper. By generously, I don’t mean dump an entire truck of salt – you should sprinkle salt in an even manner such that crystals have at least touched all of the steak. I use kosher salt (large crystals) and makes it easier for an even coat of salt. Do the same with freshly ground black pepper. Remember, both sides!
Place the steak on the broiling pan. These pans are typically the type that have two layers. The top layer is a flat metal sheet with holes in it, and it rests on another pan which will catch the drippings from cooked material below. This way, you don’t have the steak sitting in its own fat, effectively boiling – it’s an approximation of grill grates and allow the fat to drip down from the steak.
Put the steak in the oven and roast for 8-10 minutes. What you’re looking for is nice browning across the steak, not burning. After 8-10 minutes, turn the steak over, and repeat for 5-8 minutes, again, achieving a nice caramelization across the top of the steak.
The steak should be at a pretty good spot of doneness. This is where you’ll either use The Force (thank you George Lucas) or you’ll touch the steak to confirm its doneness.
See this post of mine to help with that. Checking a Steak’s Doneness.
Let the steak rest for a full 10 minutes. That means place it on your counter and put some aluminum foil on it, and let the heat carry over and the juices within the steak to equilibrate.
Now slice and eat.

You’ll oftentimes find (due to the uneven nature of the cap) that some parts are more done than others. This is actually okay. I’ll be frank, I was hugely skeptical at first. But this is the ONLY cut of beef I’ve ever enjoyed even when eating the completely brown bits. So slice it up, and enjoy!